Rust 를 찍먹해보기로 하고 회사에서 진행후 집에서 다시 셋팅을 진행하였습니다.
1. 아래 사이트에서 rustup‑init.exe 를 다운받아 실행합니다.
https://rustup.rs/
rustup.rs - The Rust toolchain installer
To install Rust, if you are running Unix, run the following in your terminal, then follow the onscreen instructions. curl --proto '=https' --tlsv1.2 -sSf https://sh.rustup.rs | sh Copied!
rustup.rs
1 을 입력후 앤터

2. 먼저 Visual Studio Code 를 설치합니다.
https://code.visualstudio.com/
Visual Studio Code - Code Editing. Redefined
Visual Studio Code is a code editor redefined and optimized for building and debugging modern web and cloud applications. Visual Studio Code is free and available on your favorite platform - Linux, macOS, and Windows.
code.visualstudio.com
3. Visual Studio Code 에서 rust-analyzer 를 설치합니다.

4. 디버깅을 위해 CodeLLDB 도 설치합니다.

5. 프로젝트를 생성합니다.
cmd 창에서 프로젝트 만들 폴더로 이동후 아래 명령을 실행합니다.
cargo new testapp6. 생성된 프로젝트 폴더로 이동하여 실행하여 Hello World 가 찍히는지 확인합니다
cargo run testapp결과

7. 명령줄에서 code . 을 하게되면 Visual Studio Code 가 열립니다.

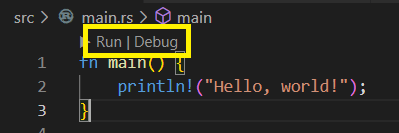
코드 상단의 Run | Dubug 를 해도 실행이 되며
F5 를 누르면 launch.json 이 자동으로 생성되면서 빌드가 됩니다.

'Etc.' 카테고리의 다른 글
| [Rust] warning 메세지 제거 방법 (0) | 2023.02.28 |
|---|---|
| Github 강좌 정리 (0) | 2022.06.14 |
| 엘든링 지도 ELDEN RING MAP (0) | 2022.03.26 |
| Mac OS 설치 시 복사본 손상 메세지 해결 방법 (5) | 2020.01.08 |
| 자동차연납 우리카드 캐시백 이벤트 (0) | 2019.01.17 |

